
FROM PICTURE TO PRINT PREPARATION
Image to STL
Turn a picture into a 3D model. Convert to STL, set the size, then prepare it for your printer.
30 free credits on day one · No card required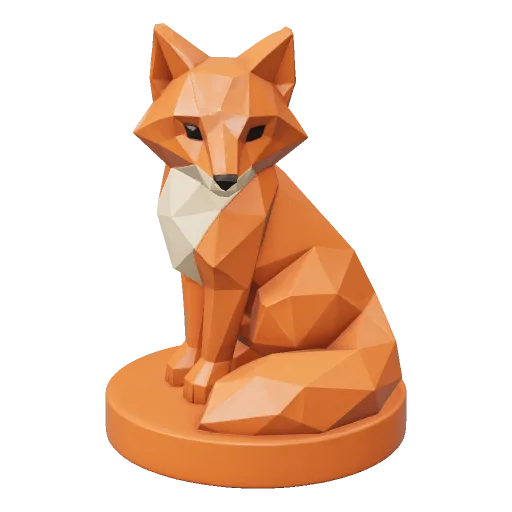
Choose the right method
Full objects, reliefs and precise parts need different workflows.
Full 3D object
Use Fomrix for figurines, props and decorative objects. AI fills in the unseen sides for you to inspect.
- Best input
- One clear photo or illustration
- Expected output
- Full 3D mesh, then STL preparation
- Figurines and collectibles
- Props and decorative objects
- Concept-driven prints
Four checkpoints between a picture and a slicer
Generating a shape and preparing a physical print are different tasks. Work through both.
- 01
Reconstruct the volume
Use a clear, complete reference to generate a decorative 3D object. A compact connected shape is easier to prepare than isolated thin details.
Reconstruct the volume - 02
Set millimeter dimensions
Convert the generated GLB to STL and choose the longest-side size. STL carries triangle coordinates without a stored unit label.
Set millimeter dimensions - 03
Check the surface
Analyze open boundaries and non-manifold edges. Limited cleanup is not hole filling or a wall-thickness guarantee; repair remaining problems in a mesh editor.
Check the surface - 04
Inspect the slice layers
Open the STL in your slicer. Verify dimensions, orientation, wall thickness, supports and the layer preview before sending it to a printer.
Inspect the slice layers
Preparation guide · examples have not been print-tested
A fox reference, real geometry to inspect
This 30-credit image job produced a GLB with 94,304 faces. Explore the base, ears and tail before exporting the surface as STL. It has not been print-tested.
REAL GENERATIONS
From reference to real 3D
Open the input and rotate the actual result. These models still need print preparation.
Before you print
STL keeps the shape, without color or textures. These examples have not been print-tested.
This checklist records your review in this browser. It does not certify that a model is printable.
Choose a reference for the shape you want to print
Prefer a clear overall volume over texture detail that will disappear in STL.
Keep print decisions separate from AI generation
Spend generation credits on the shape; use local tools to prepare and inspect the file.
See geometry without texture
Clay view removes the color cues that disappear from STL. Check the ears, tail and base as actual surfaces.
Inspect the fox in clay viewChoose a physical size
The GLB-to-STL converter accepts a longest-side dimension in millimeters. Check that value again in the slicer.
Set the STL dimensionsRecheck after external repair
Bring an edited STL back to the local analysis tool. Review reported structure and inspect the slicer again; no generation is required.
Analyze a repaired meshSpend on geometry, then prepare the STL free
Image generation uses credits. Local GLB-to-STL conversion and basic structural analysis do not.
STL keeps triangle geometry. Generate without textures when the shape is your only goal.
Estimated generation cost
Estimate for one generation. Detailed textures and other Studio settings can change the total. P1 is a separate low-poly model, not a cheaper quality switch.
Choose settings in StudioSee credit plansNew accounts: 20 welcome credits once, plus 10 on each login day during the first 7 registration days. Day one totals 30; every grant expires after 7 days. Missed days are not backfilled.
Paid plans add purchased credits for continued generation. Purchased credits do not expire. Local viewers and converters remain free.
Your STL at the slicer handoff
These are manual preparation steps, not direct printer integrations or successful print claims.
Cura · PrusaSlicer · Bambu Studio
Import the STL and verify the dimensions displayed by the slicer. Settings depend on your printer, nozzle, filament and intended strength.
- Confirm dimensions and orientation
- Review walls, overhangs and supports
- Inspect layer-by-layer continuity
Inspect fine features and supports
Fine ears and appendages need a review at the final scale. Use your resin slicer to assess supports, islands and any hollowing/drainage you create.
- Check thin features at target size
- Plan supports and drainage as needed
- Review exposure and the layer preview
Resolve structural problems first
Open boundaries, intersections or inadequate walls may need Blender or another repair tool. Export again and recheck the revised STL.
- Locate the reported defect
- Repair the surface externally
- Re-import and inspect again
When the exported STL needs more work
Treat these as separate checks instead of retrying generation for every print issue.
It imports too large or too small
STL does not store units. Compare the longest side chosen during conversion with the slicer's millimeter dimensions before changing the scale.
Review STL size settingsA slicer reports holes or missing surfaces
Run mesh analysis. Fomrix's limited cleanup removes duplicate and degenerate faces; remaining holes, intersections and thin walls need external repair.
Inspect the STLColor or tiny raised details disappeared
STL has no texture package. Detail visible only through paint or a normal map was never physical relief; inspect clay and wireframe before export.
Compare actual geometryPrint checks that a file extension cannot promise
- Watertight
- A closed surface without open boundaries. It does not establish sufficient wall thickness or eliminate every intersection.
- Wall thickness
- The physical thickness at your chosen scale. A feature can look thick on screen and still be too thin for your process.
- G-code
- Printer instructions created by a slicer for a specific machine and settings. A generated STL is not G-code.
Image to STL questions
Clear answers to common questions about generating, inspecting, repairing, and downloading 3D assets with Fomrix.
Have other questions?
Contact Fomrix support
Need guidance on a specific reference image, custom formats, or print prep? Reach out anytime.
support@fomrix.comCan I convert a JPG, PNG or photo to STL?
A JPG or PNG does not contain 3D geometry, so the image must first be turned into a 3D mesh. Fomrix uses the image as an AI reference, then the resulting mesh can continue to STL.
Can I create a printable 3D model from an image?
You can create a starting mesh from a clear image, but printable geometry still needs scale, thin-feature, manifold and slicer checks before manufacturing.
Is photo-to-STL the same as making a lithophane or heightmap?
No. A lithophane or heightmap converts brightness into surface depth, so it produces a relief. AI image-to-3D reconstruction attempts a complete object with volume, including plausible surfaces that are hidden in the photo.
Can I turn a logo or line drawing into STL?
Yes, but a clean outline extrusion is often more predictable than AI for a flat logo, badge or sign. Use AI when you want the artwork interpreted as a fuller 3D object; use vector or relief tools when exact edges and uniform depth matter.
Will the STL be immediately printable?
Not always. AI-generated geometry should be checked for holes, non-manifold edges, thin features, scale and other print constraints. Use STL Repair and your slicer preview before printing.
Can one photo show enough information for a complete 3D model?
One photo can provide a useful visual reference, but it cannot reveal the back, underside or internal structure. The AI infers those hidden surfaces, so rotate and inspect the generated model before converting it to STL.
Can AI create exact dimensions from a photo?
No. A single image does not provide reliable real-world dimensions. Enter the target size yourself and use CAD or measured references for engineering-critical parts.
Does Fomrix use multiple photos for image-to-STL generation?
The current Fomrix generator uses one reference image. Choose a clear three-quarter view that shows the complete silhouette. For measured reconstruction from multiple views, use photogrammetry, scanning or CAD instead.
Which images work best for printable models?
Objects with a clear silhouette and simple visible structure are easier starting points. Decorative figures, toys, logos and props are generally better suited than internal mechanical assemblies.
Does an STL file include color, texture or material?
Standard STL is primarily triangle geometry. It does not preserve the PBR materials, texture images, animation or scene structure that a GLB can carry. Keep the GLB when appearance still matters.
What is the difference between GLB and STL?
GLB can contain materials, textures and scene data for web 3D. STL stores surface triangles and is widely used in 3D printing. For printing, the geometry matters more than visual texture.
Give your image a new shape
Generate the model, inspect the result, then prepare the mesh for printing.